
Most vegetables go into the ground in spring.
Garlic is different, and that is part of its quiet charm.
You plant it in fall, let it grow slowly through the cool months, and harvest it in early summer.
A few cloves pressed into the soil on an autumn afternoon can become a year of homegrown bulbs.
Garlic needs little attention, but a few details make a big difference in bulb size.
This guide follows the onion, leek, shallot and garlic fact sheet from Clemson Cooperative Extension.
It covers when to plant, how to set the cloves, how to feed and water them, and how to cure the harvest.
Shallots grow in much the same way, so you will find a short section on them too.
Why Garlic Goes in During Fall
Garlic grows its leaves during cool weather.
In spring, longer days and warmer temperatures signal the plant to stop making leaves and start forming a bulb.
Clemson Extension notes that garlic must be planted in fall to develop fully.
The size of the bulb depends on how much leafy growth the plant made before bulbing began.
So the goal is simple: plant early enough to give the roots and leaves a long, cool season.
The exact planting window depends on your climate.
The Clemson fact sheet is written for South Carolina, so your local Extension office can confirm the best dates for your area.
Choose a Sunny, Well-Drained Spot
Garlic grows best in full sun.
It prefers fertile, loamy soil that drains well.
Clemson Extension puts the ideal soil pH between 6.2 and 6.5.
Soil that stays wet invites bulb rot, one of the main problems with garlic.
Soil that gets too dry gives small bulbs, and compacted soil gives bulbs with odd shapes.
If your ground is heavy or soggy, a raised garden bed is a calm fix.
Clemson Extension also suggests mixing organic matter into the soil to prevent compaction.
Plan to grow garlic and its relatives in a different spot each year.
For onions, Clemson Extension advises using the same area no more than once every four years to help prevent disease.
Test the Soil Before You Feed
A soil test is the best way to know what your garlic bed needs.
Our guide to taking a garden soil sample walks through the steps.
The report tells you the pH and how much fertilizer to add.
Without a test, Clemson Extension gives a general starting rate for South Carolina gardens.
It suggests 25 pounds of 5-10-10 fertilizer and half a pound of sulfur per 1,000 square feet before planting.
A home bed is usually much smaller, so scale the amount to the size of your bed.
A bed of 100 square feet would need one tenth of those amounts.
Choose Good Cloves
Garlic is grown from cloves, the separate sections of a bulb.
Clemson Extension notes that larger cloves grow into larger bulbs at harvest.
Break the bulb apart shortly before planting.
Plant the large outer cloves and use the small inner ones in the kitchen.
Softneck and hardneck types
There are two basic kinds of garlic.
Softneck types do not make a seed stalk.
They are easy to braid and tend to store longer.
Hardneck types send up a firm flower stalk, and their cloves peel more easily.
Clemson Extension notes that creole garlics grow easily in southern climates and tolerate rough weather better than most types.
It also notes that rocambole types do not grow well in warm climates.
Elephant garlic is not a true garlic, but it is grown the same way.
A local garden center or seed supplier can point you toward kinds that suit your region.
How to Plant the Cloves
Set each clove upright, with the pointed tip up and the flat base down.
Planting upright helps the plant grow a straight neck.
Cover each clove with about 1 inch of soil.
Space cloves 3 to 5 inches apart in the row.
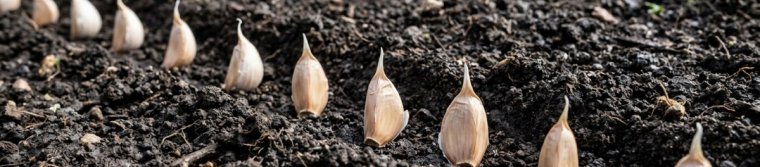
Leave 12 to 24 inches between rows.
In a small bed, a wide row works well too.
Clemson Extension describes rows about a foot wide, with cloves 3 to 4 inches apart.
Water the bed after planting to settle the soil around the cloves.
Mulch for the Winter
Garlic does not compete well with weeds.
A thick layer of mulch keeps weeds down and holds moisture in the soil.
Clemson Extension suggests weed-free straw, 4 to 6 inches deep, in late fall.
Our guide to mulching garden beds covers other materials and depths.
Pull any weeds that do come up while they are small.
Our guide to weeding without stress has gentle ways to keep beds clear.
Feeding Through the Season
Garlic grows over many months, so it benefits from small feedings along the way.
Clemson Extension gives this schedule for South Carolina gardens without a soil test:
- Mid-November: 4 pounds of calcium nitrate per 1,000 square feet.
- Early January: 10 pounds of 5-10-10 and half a pound of sulfur per 1,000 square feet.
- Mid-February: 4 pounds of calcium nitrate per 1,000 square feet.
- Early March: 4 pounds of calcium nitrate per 1,000 square feet.
Again, scale these amounts down to the size of your bed.
In colder regions the timing shifts, so follow the advice of your local Extension office.
More fertilizer is not better.
For onions, Clemson Extension warns that heavy nitrogen late in fall can leave plants more open to winter damage.
Watering
Steady soil moisture matters for garlic.
It is especially important in spring, when the bulbs are forming.
Check the bed regularly and water when the soil is dry.
As harvest nears, let the soil stay somewhat dry.
Clemson Extension notes that drier soil is best as the crop matures.
Remove the Scapes on Hardneck Garlic
In early summer, hardneck garlic sends up a firm, round stalk called a scape.
A small cluster called a topset forms near its tip.
Clemson Extension recommends cutting off the topset with a few inches of the scape.
If you leave it, the bulb ends up about 30 percent smaller on average.
Softneck garlic does not form a scape, so there is nothing to cut.
Harvest at the Right Time
Garlic is ready when the leaves begin to turn yellow in early summer.
Loosen the soil and lift the whole plant by hand or with a spading fork.
Handle the bulbs gently so you do not bruise them.
Brush off the soil, but do not wash the bulbs.
Cure and Store the Bulbs
Curing dries the outer skins so the bulbs keep well.
Clemson Extension suggests a warm, shady place with good air movement.
Hang the plants in bundles, or spread them in a single layer on screens or drying racks.
Let them dry for about two to three weeks, until the necks are dry and the outer skin is papery.
Then remove the tops.
Braid softneck types, tie several heads together, or store the bulbs in a mesh bag.
Most kinds keep for six to eight months in a cool, dry, well-ventilated spot.
Set aside a few of the largest bulbs to plant again next fall.
Growing Shallots the Same Way
Shallots are a mild, delicate member of the onion family.
Like garlic, they are planted in fall for harvest in winter and spring.
Clemson Extension suggests setting them 1 to 2 inches deep and 6 to 8 inches apart.
Keep the soil moist to help them sprout.
Each one grows into a clump of small bulbs, which often sit on top of the soil.
Do not cover those bulbs with soil.
You can pick shallots as green onions about 60 days after planting.
For dry bulbs, wait until the tops have died down completely in late spring.
Cure them in a warm, dry place for about a week, then store them in mesh bags.
Common Problems
- Bulb rot in soil that drains poorly, or in storage after bruising or poor drying.
- Thrips and root maggots, the main insect pests of garlic and onions.
- Small bulbs from soil that stays too dry.
- Irregular bulbs from compacted soil.
Good drainage, steady moisture and careful curing prevent most of them.
A Simple Garlic Checklist
- Plant in fall, early enough for a long, cool season of leaf growth.
- Choose full sun and well-drained soil with a pH near 6.2 to 6.5.
- Test the soil and feed based on the results.
- Plant large outer cloves, tip up, about 1 inch deep.
- Space cloves 3 to 5 inches apart.
- Mulch with 4 to 6 inches of weed-free straw in late fall.
- Keep the soil moist in spring, then drier near harvest.
- Cut the scapes on hardneck types.
- Harvest when the leaves yellow, then cure for two to three weeks.
A Calm Way to See It
Planting garlic is one of the calmest jobs of the garden year.
It asks for an hour in fall and a little patience through winter.
By early summer, you lift the bulbs and hang them to dry.
For another fall planting, see our guide to planting spring bulbs in fall.
Sources and Further Reading
- Clemson Cooperative Extension, Home and Garden Information Center — Onion, Leek, Shallot and Garlic: supports fall planting, site and soil pH, clove size, softneck and hardneck types, planting depth and spacing, fertilizer schedule, watering, straw mulch, scape removal, harvest, curing, storage, shallots and common problems.
- Clemson Cooperative Extension — Soil Testing: how to test soil before adding lime or fertilizer.
- Clemson Cooperative Extension — Mulch: choosing and spreading mulch over garden beds.