
A garden with a fresh layer of mulch looks finished and calm.
The soil underneath is calmer too.
It stays moist longer, holds a steadier temperature, and grows far fewer weeds.
Mulch is any material spread over the soil to protect or improve it.
Nature does this all the time with fallen leaves, needles, and twigs.
When we mulch, we simply copy that habit on purpose.
This guide draws on the mulch fact sheet from Clemson Cooperative Extension.
It also uses the University of California Statewide Integrated Pest Management Program page on landscape mulches.
What Mulch Does for Your Garden
- Slows water loss from the soil by evaporation.
- Blocks the light that weed seeds need to sprout.
- Keeps soil cooler in summer and warmer in winter.
- Stops soil from splashing onto leaves, which can spread disease.
- Reduces erosion, crusting, and compaction.
- Feeds the soil as organic types break down.
Clemson Extension also notes that mulched plants tend to grow more roots.
They send extra roots into the moist zone under the mulch.
Organic and Inorganic Mulches
There are two broad groups.
Organic mulches come from natural materials such as bark, wood chips, leaves, pine needles, straw, and compost.
They break down over time, improve the soil, and need topping up every so often.
Inorganic mulches include gravel, pebbles, and landscape fabric.
They last a long time but do not add anything to the soil.
For vegetable and flower beds, organic mulch is usually the calm, simple choice.
Choosing a Material
- Shredded leaves. Free and easy to find in fall. Shred them coarsely so they do not blow away or mat down.
- Pine bark. Attractive and dark. Large nuggets can float away in heavy rain.
- Pine needles. They knit together and stay in place on slopes. They suit acid-loving shrubs.
- Shredded hardwood. Suppresses weeds well and breaks down slowly.
- Wood chips. Inexpensive and great for paths. Small chips break down fast and use nitrogen from the soil as they do.
- Straw. A classic for vegetable gardens. Use straw, not hay, because hay carries many weed seeds.
- Grass clippings. Use thin, dry layers only. Never use clippings from lawns treated with herbicides.
Step 1: Weed and Prepare First
Mulch works best on clean, prepared soil.
Pull existing weeds before you spread anything.
UC IPM advises removing perennial weeds and their roots first. Mulch alone will not stop them.
Set up any soaker hoses or drip lines now as well.
It is much easier to lay them under the mulch than to dig them in later.
Water the bed if the soil is dry.
Mulch helps hold moisture in, but it does not create moisture.
Step 2: Spread to the Right Depth
Depth is where many beginners go wrong.
More is not always better.
Clemson Extension gives clear guidance by texture:
- Fine wood and bark mulches: no more than two to three inches.
- Coarse mulches, such as pine bark nuggets: up to about four inches.
- Grass clippings or shredded leaves: never deeper than two inches.
Too much fine mulch can smother roots.
Plants may respond with yellow leaves and poor growth.
Fine, flat materials tend to mat together.
A thick mat blocks water and air from reaching the roots.
Step 3: Keep Mulch Away From Stems and Trunks
This is the single most important habit in mulching.
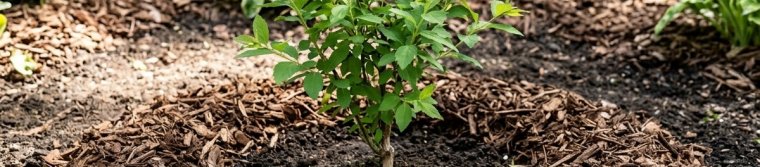
Mulch piled against stems stays wet and invites rot and disease.
Clemson Extension recommends keeping mulch two to three inches away from the stems of woody plants.
UC IPM suggests six inches or more around tree trunks.
Picture a doughnut, not a volcano.
The mulch forms a wide ring with an open center around the trunk.
Keep mulch six to 12 inches away from the walls of your house as well.
Clemson explains that this keeps termites from using mulch as a bridge over treated soil.
Step 4: Mulch at the Right Time
Mulch new plantings right after you plant them.
This protects the root ball while new roots grow out.
Around established plants, early spring is the best time.
Plants are waking up, and most weed seeds have not sprouted yet.
A light layer of pine straw can also cover tender low plants on a frosty night.
Step 5: Water the New Layer
Give fresh mulch a good soak after you spread it.
Clemson Extension explains that thick, dry mulch can grow a fungal mat that repels water.
If you find a crusty, matted layer later, break it up with a rake or claw cultivator.
How Much Mulch to Buy
A little math saves an extra trip to the store.
First find the area of your bed in square feet by multiplying length by width.
Multiply that area by the depth you want in inches.
Then divide by 324.
The answer is the number of cubic yards you need.
For example, a bed ten feet by twelve feet is 120 square feet.
At three inches deep, that is 360 divided by 324, or about 1.1 cubic yards.
Bagged mulch is often sold by the cubic foot.
One cubic yard equals 27 cubic feet.
Topping Up Over Time
Organic mulch settles and breaks down, so it needs refreshing.
Leaves and grass clippings break down quickly and need frequent topping up.
Pine needles and bark usually last two to four years before you need to add more.
Before adding a new layer, check the depth of the old one.
Rake it loose and add only what you need to reach the right depth again.
Small Surprises You May See
- Slime mold. Bright yellow or orange blobs after warm, damp weather. UC IPM notes it is harmless and dries out in a day or two.
- Mushrooms. Common in decaying mulch. Remove them where children or pets play, since some are toxic.
- Sour mulch. Mulch stored wet and airless can smell like vinegar or ammonia. Do not spread it, because it can damage plants.
- Artillery fungus. Tiny black specks on siding or cars. Clemson suggests pure bark mulch, such as pine bark, where this is a problem.
A Simple Mulching Checklist
- Weed and water the bed first.
- Choose an organic mulch that suits the bed.
- Spread two to three inches of fine material, or up to four inches of coarse.
- Keep a clear gap around every stem and trunk.
- Keep mulch six to 12 inches from house walls.
- Water the new layer well.
- Check the depth each spring and top up as needed.
A Calm Way to See It
Mulching is one of the easiest gifts you can give a garden.
An afternoon of spreading saves weeks of weeding and watering later.
Start with one bed, follow the depth guide, and keep the stems clear.
Your plants will likely show the difference by midsummer.
If you are building new beds, our guide to building and filling a raised garden bed pairs well with this one.
Sources and Further Reading
- Clemson Cooperative Extension, Home and Garden Information Center — Mulch: supports the benefits of mulch, the material notes, depth by texture, distance from stems and house walls, timing, quantity math, topping up, and the problems section.
- UC Statewide Integrated Pest Management Program — Mulches: supports weed control, removing perennial weeds first, keeping mulch six inches or more from trunks, and that slime mold is harmless.