
Weeds have a way of showing up the moment you look away.
One week the bed looks tidy, and the next it is green with seedlings you did not plant.
It is easy to feel like weeding never ends.
The calm truth is that a few steady habits cut the work down a great deal.
Most home gardens do not need weed killers at all.
The University of California Integrated Pest Management Program says this clearly.
With hand weeding and mulch, home gardeners usually should not need herbicides in existing plantings.
This guide follows the UC IPM Pest Notes on weed management in landscapes.
Know the Two Main Kinds of Weeds
Annual weeds
Annual weeds sprout from seed, grow, flower, and die within a year.
Crabgrass, purslane, and spurge are common examples.
The goal with annuals is simple: never let them make seed.
One plant that goes to seed can fill a bed for years.
Perennial weeds
Perennial weeds live for several years.
Many spread by roots, runners, bulbs, or tubers below the soil.
Dandelion, field bindweed, bermudagrass, and nutsedge are common examples.
UC IPM notes that removing aggressive perennials before they set seed is especially important.
Their underground parts let them come back if you only pull the top.
Step 1: Start Clean Before You Plant
The easiest time to deal with weeds is before a new bed is planted.
Dig out existing weeds, roots and all.
Then try a simple trick that UC IPM describes.
Water the bare bed and wait for a flush of weed seedlings to sprout.
While they are still tiny, remove them by hand or with very shallow hoeing.
UC IPM suggests repeating this water-and-remove cycle two or three more times.
Each round uses up weed seeds near the surface before your plants go in.
This small effort greatly reduces weeds in the months ahead.
Step 2: Do Not Bring New Weeds In
Weed seeds often arrive with the things we add to the garden.
UC IPM points to soil, compost, and the potting mix of new plants as common sources.
- Buy soil and compost from a reputable source.
- Check new plants for weeds in the pot before planting.
- Pull any weeds out of the root ball, especially perennials.
- Brush or rinse soil off shovels, hoes, and mower blades between areas.
Homemade compost from a hot, well-managed pile is less likely to carry weed seeds.
Our guide to starting a backyard compost pile explains the basics.
Step 3: Pull Weeds While They Are Young
Young weeds come out with very little effort.
Their roots are small, and they have not had time to set seed.
UC IPM recommends removing young weeds by hand before they flower.
Frequent removal of small weeds quickly lowers the number of annual weeds over time.
The easiest moment is after a rain or a deep watering.
Moist soil lets roots slide out whole.
Grip the weed low, close to the soil, and pull slowly and steadily.
A short walk through the garden twice a week is often enough.
Ten calm minutes now saves an afternoon of hard work later.
Step 4: Dig Out Perennial Roots
Perennial weeds need a little more care.
Pulling the top often snaps the root, and the weed simply regrows.
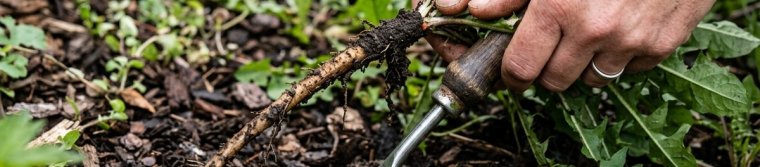
UC IPM suggests using a dandelion knife or a similar narrow tool.
Push the tool down beside the root to loosen the soil.
Then lift the whole root out without disturbing too much soil around it.
Check the spot again in a week or two.
If new leaves appear, dig again.
Each time you remove the top, the root loses stored energy.
Step 5: Hoe Shallowly, Not Deeply
A hoe is a quick way to clear annual weeds between plants.
The key is to stay near the surface.
UC IPM advises against deep cultivation.
Digging deeply brings buried weed seeds up to the light, where they sprout.
It can also damage shallow roots of the plants you want.
Slice weeds just below the soil surface, less than an inch deep.
Hoe on a dry, sunny day so the cut weeds wither quickly.
Avoid hoeing perennial weeds with runners, since chopping can spread the pieces.
Step 6: Mulch Is Your Best Helper
UC IPM calls mulching the key to controlling weeds.
Mulch blocks the sunlight that most weed seeds need to sprout.
Organic mulches include wood chips, bark, shredded leaves, and compost.
They also hold moisture and slowly feed the soil.
Depth matters:
- Fine-textured mulch should be about 2 inches deep.
- Coarse mulch can go up to about 4 inches deep.
- Going deeper than 4 inches can keep soil too wet and harm roots.
UC IPM notes that very large pieces let light through the gaps, so medium pieces work better.
Organic mulch breaks down over time.
Top it up as it thins so it keeps doing its job.
If a few seedlings sprout in the mulch, a light raking removes them.
Our guide to mulching garden beds covers materials and timing in more detail.
Step 7: Fill Bare Soil With Plants
Weeds move into any open, sunny soil.
UC IPM recommends getting new plantings established quickly so they cover bare areas.
Plants spaced to shade the ground leave little room for weeds.
In a vegetable bed, a cover crop can do the same job between seasons.
Our guide to cover crops for the home garden shows how.
Step 8: Water Only Where Plants Grow
Sprinklers water everything, including the empty spaces between plants.
UC IPM explains that this wastes water and encourages weeds there.
Drip lines and soaker hoses place water at or near your plants.
The dry soil between them stays less friendly to weed seeds.
A Word on Landscape Fabric
Landscape fabric can help under shrubs and trees that stay in place for years.
UC IPM recommends covering it with a shallow layer of mulch, about an inch deep.
It is not a good fit for vegetable or flower beds that you replant often.
Black plastic is not preferred for long-term use in beds, since it restricts air and water.
Some weeds, such as yellow nutsedge, can push through thinner fabrics.
If You Ever Consider an Herbicide
UC IPM says herbicides are best saved for special problems, like stubborn perennial weeds.
They can injure the plants you want, so they need great care.
Never use mulch products with pre-applied herbicide around food plants.
If you choose any product, read and follow every direction on the label.
For most home gardens, the steps above are enough.
A Simple Weeding Checklist
- Clear weeds and roots before planting a new bed.
- Water, wait, and remove seedlings two or three times before planting.
- Check new plants and soil for hitchhiking weeds.
- Pull weeds young, after rain, before they flower.
- Dig out perennial roots with a narrow tool.
- Hoe less than an inch deep.
- Keep 2 to 4 inches of mulch and top it up.
- Water at the plants, not the whole bed.
A Calm Way to See It
A weed-free garden is not a garden with no weeds ever.
It is a garden where weeds are caught small and never allowed to seed.
Each season there are fewer seeds in the soil, and the work gets lighter.
A raised garden bed filled with clean soil is another calm way to start fresh.
Sources and Further Reading
- UC Statewide Integrated Pest Management Program — Pest Notes: Weed Management in Landscapes: supports annual and perennial weeds, the water-and-remove cycle before planting, avoiding weed seeds in soil and plants, hand weeding, the dandelion knife, shallow cultivation, mulch types and depths, drip irrigation, landscape fabric, and herbicides not usually being needed.
- UC Statewide Integrated Pest Management Program — Mulches: more detail on organic and inorganic mulches for weed control.
- US Environmental Protection Agency — Composting At Home: how to make compost at home.