
Planting a tree feels like a promise to the future.
It will shade the yard, shelter birds and keep growing for decades.
Yet many young trees struggle in their first years for very simple reasons.
Clemson Cooperative Extension points to two of the most common and serious mistakes.
The tree is planted too deep, or it gets too little or too much water.
The calm news is that both are easy to avoid.
This guide follows the planting trees correctly fact sheet from Clemson Extension.
It walks through each step, from choosing the season to the first months of watering.
When to Plant
Trees come from the nursery in two main forms.
Container-grown trees are raised in a pot.
Balled-and-burlapped trees are dug from a field with a ball of soil wrapped around the roots.
Clemson Extension notes that container-grown trees can be planted at any time of year.
Fall is usually the best season.
The top of the tree rests in winter, but in mild climates the roots keep growing through fall and winter.
That extra root growth can make the tree less dependent on watering the following summer.
Many balled-and-burlapped trees are dug and planted in the cooler months after the leaves drop.
Start With Good Drainage
Clemson Extension calls poorly drained soil a leading cause of plant problems in the landscape.
Before you dig, watch where water stands after a heavy rain.
Avoid low dips and pockets where puddles stay for hours.
If the whole site drains poorly, Clemson suggests raising the planting bed 8 to 12 inches above the existing grade.
Near new construction, remove buried debris such as concrete chunks, shingles and tar.
These leftovers can cause growth problems for years.
Test the Soil First
A soil test tells you which nutrients are needed and whether the pH needs adjusting.
Clemson Extension recommends sampling several weeks before planting.
Most ornamental plants prefer a soil pH between 5.8 and 6.5.
Adjusting pH without a test can create nutrient problems that are hard to fix.
Our guide to taking a garden soil sample shows how to collect one.
Step 1: Dig a Wide, Shallow Hole
This is the step that matters most.
Measure the height of the root ball, from its base to the topmost roots.
In well-drained soil, Clemson Extension says the hole should never be deeper than that height.
Leave the soil at the bottom of the hole undisturbed.
Loose soil underneath lets the tree settle and sink too deep over time.
Make the hole wide instead.
Clemson recommends a hole at least twice, and preferably five times, as wide as the root ball.
Roots spread faster into loosened soil, so the tree settles in sooner.
In heavy clay, notch the smooth sides of the hole with a shovel.
That helps new roots move out into the surrounding soil.
Step 2: Find the Top Roots
Gently brush away soil or potting mix on top of the root ball.
Find the uppermost layer of roots.
That layer should sit level with the surrounding ground once the tree is planted.
Clemson Extension warns that even half an inch of extra soil over the root ball can keep water out.
Only mulch should cover the root ball after planting.
In wet or compacted soil
Where drainage is poor, set the root ball 2 to 4 inches higher than the surrounding soil.
Build soil up around the sides so they are not exposed.
Do not pile extra soil on top of the root ball.
The top of a raised root ball can dry quickly in summer, so check it often.
Step 3: Prepare the Root Ball
Container-grown trees
Slide the tree out of its pot and look at the roots.
Cut any roots that circle the outside, so they cannot strangle the trunk later.
If the tree is pot-bound, Clemson Extension suggests three or four shallow slices down the sides.
Make each slice 1 to 2 inches deep, from the top of the ball to the bottom.
Then pull the outer roots gently away from the ball.
New roots grow from behind the cut ends and spread into the soil around them.
Balled-and-burlapped trees
Set the tree in the hole first, standing straight.
Lift and handle the root ball itself, never the trunk, so the soil ball does not crack.
Synthetic burlap does not break down and can girdle the roots, so remove it entirely.
Natural burlap can stay on the sides and bottom, but remove it from the top.
Cut away at least the top part of any wire basket.
Remove any strapping or twine wrapped around the trunk.
If you are not sure which kind of burlap you have, ask the nursery before you plant.
Step 4: Backfill With the Original Soil
The soil you put back around the roots is called backfill.
Clemson Extension recommends the loosened native soil from the hole, mixed with 10 to 20 percent compost.
Avoid filling the hole with rich, fluffy soil that differs sharply from the ground around it.
Roots may then stay inside the hole instead of spreading outward.
Fine peat moss in the hole can also hold too much water after rain.
Never use fresh, uncomposted bark as an amendment.
As it breaks down, it pulls nitrogen from the soil and can lower the pH.
Break up clods before you backfill, since they leave air pockets around the roots.
Fill the bottom half of the hole and tamp lightly with your foot.
Finish filling, then tamp gently again without packing the soil hard.
Step 5: Build a Water Ring
At first, the roots live only inside the original root ball.
Water has to reach that ball directly.
Clemson Extension suggests a ridge of soil about 3 inches high around the edge of the root ball.
It holds water right where the roots can use it.
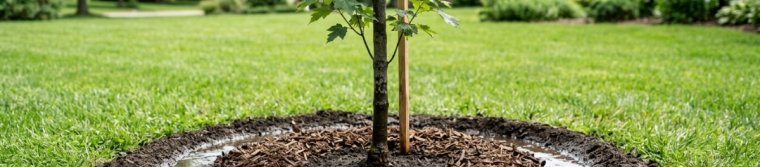
Remove the ring by the end of the second growing season if it has not settled on its own.
Step 6: Mulch, but Keep It Off the Trunk
Clemson Extension recommends 2 to 4 inches of organic mulch over the planted area.
Pine straw, pine bark, hardwood bark, wood chips and partly shredded leaves all work.
Mulch holds moisture, keeps weeds down and evens out soil temperature.
Keep it from touching the trunk, which reduces the chance of rot.
Avoid piling mulch into a cone against the bark, a habit often called volcano mulching.
Our guide to mulching garden beds covers depth and materials in more detail.
Step 7: Water Slowly and Steadily
After mulching, water the tree slowly and deeply.
Clemson Extension notes that many new plants die from too little or too much water in the first months.
Trees in well-drained soil often get too little.
Trees in poorly drained soil often get too much.
Aim for steady moisture in the root ball, not soggy soil.
Feel the soil a few inches down before you water again.
Some sites dry out faster than others, so let the soil guide you.
Good watering helps the tree establish faster and resist drought, pests and disease sooner.
Go Easy on Pruning
A newly planted tree needs little, if any, pruning.
Clemson Extension says pruning to make up for lost roots does not help.
Remove only branches that are broken, dead or diseased.
Correct poor structure early, but save most shaping for a year or two after planting.
Our guide to pruning shrubs explains how to make clean cuts.
A Simple Tree Planting Checklist
- Plant in fall when you can.
- Choose a well-drained spot, or raise the bed.
- Test the soil a few weeks ahead.
- Dig no deeper than the root ball, and two to five times as wide.
- Set the top roots level with the ground.
- Cut circling roots and remove synthetic burlap, wire and strapping.
- Backfill with native soil plus 10 to 20 percent compost.
- Build a 3-inch water ring.
- Mulch 2 to 4 inches deep, away from the trunk.
- Keep the root ball evenly moist for the first months.
A Calm Way to See It
A tree planted at the right depth, with steady water, has already passed the hardest part.
The rest is patience.
In a few seasons the roots spread out, and the tree begins to take care of itself.
Sources and Further Reading
- Clemson Cooperative Extension, Home and Garden Information Center — Planting Trees Correctly: supports planting season, drainage, soil pH range, hole depth and width, root ball preparation, burlap and wire removal, backfill with compost, the water ring, mulch depth, watering and pruning at planting.
- Clemson Cooperative Extension — Soil Testing: how and when to test soil before planting.
- Clemson Cooperative Extension — Mulch: choosing and spreading mulch around trees and shrubs.