
Wild blackberries grow along fences and field edges across much of the Southeast.
Garden varieties have been bred to be bigger, sweeter, more productive and often thornless.
With a sunny spot and a simple trellis, a short row can give generous harvests.
Birds and other wildlife love the berries too, so a little planning helps you get your share.
This guide follows the blackberry fact sheet from Clemson Cooperative Extension.
It covers how the canes grow, where to plant, trellising, watering, pruning and harvest.
How Blackberry Canes Grow
Blackberries grow from a crown that sends up new shoots every year.
Each shoot lives for two years and then dies.
In its first year, a shoot is called a primocane.
In its second year, it is called a floricane.
Many varieties fruit only on floricanes, the second-year canes.
Newer primocane varieties fruit on both first- and second-year canes.
In many areas, they give a spring crop and a second crop in late summer or fall.
Clemson Extension notes an easy way to tell the canes apart.
Primocanes have five leaflets per leaf, while floricanes have three.
Growth habits
Varieties are also grouped by how they grow.
- Erect types stand upright and can support themselves if kept short.
- Semi-trailing types arch over and do best on a trellis.
- Trailing types grow long, flexible canes that need support.
Most modern garden varieties are thornless, which makes picking and pruning far more pleasant.
Choose a Sunny, Well-Drained Site
Full sun is essential.
Clemson Extension warns that blackberries in part shade carry more disease and never yield well.
The soil should drain well and have a pH of 6.0 to 6.5.
Test the soil four to six months before planting.
That leaves time for lime or sulfur to work if the test calls for them.
Our guide to taking a garden soil sample explains the first step.
Our guide to raising or lowering soil pH explains the second.
If you can, run rows from north to south.
Both sides of the plants then get even sunlight, which helps the fruit ripen.
Planting
Plant in early spring, about four to six weeks before the last frost.
Mix compost with the native soil in each planting hole.
Set the crown about 2 inches below the soil line and spread the roots carefully.
Spacing
- Semi-trailing types: 6 to 8 feet apart in the row, with rows 10 feet apart.
- Erect types: 2 to 4 feet apart in the row, with rows 10 feet apart.
Root cuttings
Some blackberries are sold as root cuttings.
Lay them flat in the trench.
Cover them 4 to 6 inches deep in sandy soil, or 3 to 4 inches deep in clay.
Give Them a Trellis
Trellising helps prevent disease and keeps fruit from rotting on the ground.
It also keeps the row tidy and easy to pick.
The most common design is the V-trellis.
Clemson Extension describes it in a few steps.
- Drive pairs of 8-foot metal posts into the ground at a 20- to 30-degree angle, forming a V.
- Space each pair 20 to 25 feet apart along the row.
- Anchor each end of the row with a sturdy wooden or metal post.
- Run two rows of high-tensile wire, at about 2 feet and 5 feet high.
The lower wire shapes the plant, and the upper wire supports the canes.
Tie the canes loosely to the top wire.
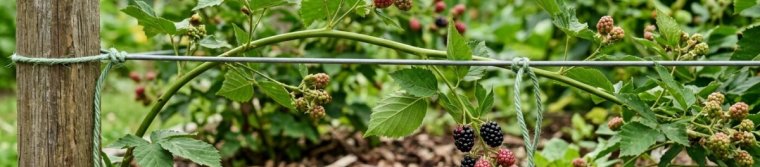
The V shape lets in plenty of light and air.
Simpler hedgerow and T-shaped trellises work on the same basic idea.
Mulch and Water
Mulch holds moisture and helps control weeds.
Wood chips and pine straw are common choices for a home garden.
Blackberries tolerate drought once they are established.
Still, they need plenty of water while getting started and while fruiting.
Clemson Extension suggests about 1 inch of water per week when rain falls short.
Keep a weed-free strip 2 to 3 feet wide on each side of the row.
That strip cuts competition for water and nutrients.
Our guide to weeding without stress shares gentle ways to keep it clear.
Our guide to mulching garden beds covers depth and materials.
Feeding
Fertilize in early spring as growth starts, and again just after harvest.
Let a soil test guide the amount.
For the first year or two, spread fertilizer in a circle about 12 inches around each plant.
On older plants, spread it evenly along the row.
Pruning Made Simple
Pruning makes sense once you remember the two-year cycle.
The canes that just fruited will die anyway, so they can go.
- After harvest, cut out the floricanes that just fruited.
- In the dormant season, remove any dead, diseased or weak canes.
- Thin the new primocanes to 3 to 6 strong shoots per plant.
Dead floricanes are easy to spot in winter, since they look dry and gray.
Erect varieties
Erect blackberries can stand without a trellis if you keep them short.
When new shoots reach 30 to 36 inches, cut off the tips.
This tip pruning makes the canes branch out.
Keep the canes from growing taller than about 3 to 4 feet through summer.
In winter, shorten the side branches to 12 to 14 inches.
That gives larger berries and easier picking.
Harvest
A blackberry is ripe when it loses its glossy shine and turns slightly dull.
That is also when the flavor peaks.
In the South Carolina Piedmont, trailing and semi-trailing types begin ripening in late June.
Erect types ripen about two weeks earlier.
The harvest lasts two to three weeks for each variety.
Planting several varieties, including a primocane type, stretches the season.
Picking for better shelf life
- Pick in the cooler part of the day, after the morning dew has dried.
- Refrigerate the berries soon after picking.
- Store them only two or three berries deep in a container that breathes.
- Remove soft or rotten berries from the plants as you pick.
Clemson Extension notes that plants kept clean of soft berries return better yields.
Common Problems
Clemson Extension lists aphids, Japanese beetles, stink bugs, spotted-wing drosophila and spider mites as common pests.
Hand removal and natural enemies often keep damage low.
Picking fruit as it ripens also helps, since overripe berries draw insects.
Diseases can affect the crown, canes, leaves and fruit.
Gray mold, also called botrytis, is the most common fruit rot.
Full sun, good spacing, a trellis and steady cleanup prevent many problems.
When disease appears, remove the infected canes and fruit and throw them away.
Our guide to aphids in the garden covers gentle ways to handle them.
Our guide to powdery mildew explains a leaf disease that also affects blackberries.
A Simple Blackberry Checklist
- Plant in full sun, in well-drained soil with a pH of 6.0 to 6.5.
- Test the soil four to six months ahead.
- Plant in early spring, with the crown about 2 inches deep.
- Space erect types 2 to 4 feet apart and semi-trailing types 6 to 8 feet apart.
- Build a V-trellis with wires at about 2 and 5 feet.
- Give about 1 inch of water a week when rain falls short.
- Keep a weed-free strip on both sides of the row.
- Feed in early spring and again after harvest.
- Cut out canes that have fruited, and thin new canes to 3 to 6.
- Pick berries when they turn dull, in the cool of the day.
A Calm Way to See It
Blackberries follow a steady two-year rhythm.
New canes grow, old canes fruit and then make room.
Once you see that pattern, the yearly care becomes simple and quick.
Sources and Further Reading
- Clemson Cooperative Extension, Home and Garden Information Center — Blackberry: supports the cane cycle, growth habits, site and pH, planting time, depth and spacing, the V-trellis, mulch and water, feeding, pruning, harvest timing, storage, pests and diseases.
- Clemson Cooperative Extension — Soil Testing: how to test soil before planting.
- Clemson Cooperative Extension — How to Change Soil pH: using lime or sulfur to adjust pH.
- Clemson Cooperative Extension — Integrated Pest Management for Aphids: gentle ways to manage aphids.