
Most houseplants live in the same pot for a long time.
Then one day the water runs straight through, or the mix stays soggy for days.
Maybe roots are poking out of the drainage hole.
These are quiet signs that the plant may be ready for a new home.
Repotting can feel like a big, messy job.
In practice, it is a calm half hour with a few simple steps.
This guide walks you through them in order.
It draws on the University of Maryland Extension and the University of California IPM program.
The goal is simple: fresh mix, a pot that drains, and healthy roots set at the right depth.
Step 1: Decide Whether the Plant Needs Repotting
Not every plant needs a new pot every year.
Look for a few practical signs instead of following the calendar.
The University of Maryland Extension offers a useful clue during the finger test.
If your finger cannot push about two inches into the mix, something has changed.
The plant may need a more porous mix, or it may be root bound.
The same guide suggests repotting when salts build up or the pot drains poorly.
- Your finger cannot get two inches into the mix.
- Water sits on top for a long time or drains very slowly.
- A white crust forms on the mix or around the pot.
- Roots are pushing out of the drainage hole.
- The current pot has no drainage hole at all.
A healthy plant with none of these signs can usually stay where it is.
There is no prize for repotting more often than needed.
Step 2: Gather What You Need
Having everything within reach keeps the job calm and quick.
- A clean pot with at least one drainage hole, only a little larger than the old one.
- Fresh potting mix suited to the plant.
- Old newspaper or a tray to catch spills.
- Gloves, if the plant has sap that bothers your skin.
- Clean scissors or pruners.
- A watering can and a sink nearby.
If you reuse an old pot, scrub it with soap and water first and rinse it well.
Our guide to choosing a pot with good drainage explains size, material and saucers.
Step 3: Slip the Plant Out Gently
Lay the newspaper down and set the pot on its side.
Support the base of the stems with one hand.
With the other hand, tap or squeeze the sides of the pot.
Slide the plant out slowly, keeping the root ball in one piece.
If it sticks, run a dull knife around the inside edge of the pot.
Never pull the plant out by its stems or leaves.
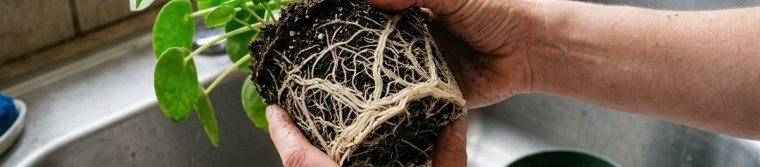
Step 4: Look Closely at the Roots
This is the most useful moment of the whole job.
For the first time in months, you can see what is happening below the surface.
The UC Pest Notes on Phytophthora root and crown rot encourage slipping plants out to examine the roots.
They advise avoiding plants that are severely pot-bound or have brown roots on the outside of the root ball.
The same page compares a healthy pale rootlet with a black root killed by root rot.
- Healthy roots are usually pale and firm.
- Dark, soft or mushy roots can be a sign of rot.
- Roots circling tightly around the outside mean the plant has run out of room.
If many roots look dark and soft, read our root rot guide before you go on.
The UC program notes that contaminated soil and decaying plant parts can carry the disease to new plants.
So never reuse the old mix from a plant with rotting roots.
Step 5: Loosen and Tidy the Root Ball
Gently tease apart roots that circle the outside of the root ball.
Work slowly with your fingers, as if loosening a tangle of yarn.
Shake off loose, old mix, especially any crusty layer from the top.
Use clean scissors to trim roots that are clearly dead or broken.
Leave healthy roots alone, even if they look long.
The aim is to help roots grow outward into the new mix, not to prune the plant hard.
Step 6: Set the Plant at the Same Depth
Add a layer of fresh mix to the bottom of the new pot.
Set the plant in and check the height before you fill around it.
The UC Pest Notes advise against planting deeper than the plant grew before.
They also say never to cover the root crown with soil or mulch.
The root crown is where the roots meet the stem, near the surface of the mix.
- Adjust the mix underneath until the top of the root ball sits at its old level.
- Leave some space below the rim so water does not spill over.
- Fill around the sides with fresh mix.
- Firm it gently with your fingers, without packing it hard.
Do not bury the stems deeper than they were in the old pot.
Step 7: Water Well and Let It Drain
The first watering settles the mix around the roots.
The UMD Extension recommends watering from the top until water drains freely from the bottom.
Small plants can go into the sink and return to their spot after draining.
Empty any water left in the saucer.
The UMD guide is clear: never let your houseplants sit in water.
If the mix sinks after watering, add a little more to bring it back to the right level.
Our guide on how to water indoor plants explains the routine in detail.
Aftercare: The First Few Weeks
A freshly repotted plant needs a calm, steady spot.
Return it to the light it was used to, out of harsh direct sun and drafts.
Before the next watering, check the mix about two inches down.
Water only when it feels dry at that depth.
The UC Pest Notes recommend letting the top few inches of soil dry between waterings.
They warn that rot can develop in as little as four to eight hours of soil saturation.
A larger pot holds more water, so it may stay moist longer than the old one.
That is one more reason to check before watering, rather than following a schedule.
A few droopy leaves in the first days are common as the roots settle.
Watch the new growth over the following weeks for the real answer.
Common Mistakes to Avoid
- Jumping to a much larger pot, which holds extra wet mix around small roots.
- Choosing a pot with no drainage hole.
- Burying the stems deeper than before.
- Reusing old mix from a plant that had root rot.
- Watering again before the mix has had a chance to dry.
- Repotting a healthy plant that shows no signs of needing it.
Each of these comes back to the same idea: give the roots air as well as water.
A Calm Checklist
- Repot when the mix is hard to probe, drains poorly or crusts with salt.
- Choose a clean pot with a drainage hole, only a little larger.
- Slide the plant out by supporting the base, never by the stems.
- Check the roots: pale and firm is good, dark and soft needs attention.
- Loosen circling roots and trim only what is dead.
- Plant at the same depth and keep the root crown uncovered.
- Water until it drains, then empty the saucer.
- Wait until the mix is dry two inches down before watering again.
Repotting is less about the new pot and more about the roots inside it.
Done gently, it gives a plant fresh room to grow for the seasons ahead.
And it gives you a rare, calm look at the hidden half of your plant.
Sources and Further Reading
- University of Maryland Extension — Watering Indoor Plants: supports the two-inch finger test, a mix that is hard to probe pointing to a root-bound plant, repotting when salts are high or drainage is poor, watering until it drains and never leaving plants in water.
- UC Statewide Integrated Pest Management Program — Pest Notes: Phytophthora Root and Crown Rot: supports examining the root system, healthy pale roots versus dark rotted roots, not planting deeper than before, keeping the root crown uncovered, contaminated soil as a source of infection and letting the top inches of soil dry between waterings.