
A new shrub from the garden center looks tidy and full in its pot.
Yet what happens in the first hour after you bring it home shapes much of its future.
A hole that is too deep or roots left circling can hold a shrub back for years.
The good news is that planting well is not complicated.
This guide follows the planting shrubs fact sheet from Clemson Cooperative Extension.
It covers timing, soil, the three kinds of root balls, planting depth, backfill, mulch and watering.
Fall Is the Best Season
Clemson Extension calls fall the best season to plant shrubs in South Carolina.
Through fall and winter, the tops of most shrubs rest and stop growing.
The roots keep growing, though, as long as the soil does not freeze.
By spring, the shrub has a head start of new roots to find water and nutrients.
Shrubs planted in spring or summer can still do well.
They simply need closer attention to watering during hot, dry weather.
Their few new roots must supply leaves that are already growing fast.
In colder regions, your local Extension office can suggest the best planting window.
Test the Soil First
Before planting, test the soil to learn its pH and nutrient levels.
The report tells you whether lime or fertilizer is needed, and how much.
Clemson Extension suggests testing several weeks ahead, and ideally three to four months ahead.
Lime takes 8 to 12 weeks to change the soil pH.
Most garden plants prefer slightly acidic soil.
Azaleas and blueberries like it even more acidic.
Our guide to taking a garden soil sample walks through the steps.
Avoid adjusting pH by guesswork, since mistakes can be hard to correct.
Go Easy on Amendments in the Hole
Plant tags often suggest mixing compost into each planting hole.
Research points the other way, according to Clemson Extension.
It is better to backfill a single planting hole with the native soil you dug out.
Rich soil in the hole is very different from the soil around it.
Roots then tend to stay inside the soft hole instead of spreading into the ground.
When amending makes sense
If you are planting a whole bed of shrubs, amend the entire area evenly.
Add no more than 10 to 20 percent organic matter by volume.
For a bed prepared 8 inches deep, that means 1 to 2 inches of organic matter mixed in well.
Clay soil and glazed walls
In heavy clay, the sides of a hole can turn smooth and hard, like the inside of a clay pot.
Use a shovel or mattock to notch and roughen the walls.
New roots can then push into the surrounding soil more easily.
Plan for Drainage
Few shrubs tolerate long periods of standing water.
If the site drains poorly, Clemson Extension suggests raising the bed 8 to 12 inches.
Use native soil or topsoil from a reputable supplier.
Rake the finished bed smooth so water does not collect in low spots.
Shape it so extra water flows away from the house.
On new construction sites, first clear out debris such as concrete, shingles, paint and sheetrock.
Three Kinds of Root Balls
Shrubs are sold in three main forms, and each needs a slightly different check.
Container shrubs
Most shrubs come in plastic pots.
Before planting, look closely at the root ball.
First find the root flare, where the stem widens into the topmost roots.
Shrubs moved into bigger pots are sometimes set too deep.
Gently brush potting mix away from the top until you reach the uppermost roots.
Next, check for roots circling the outside of the root ball.
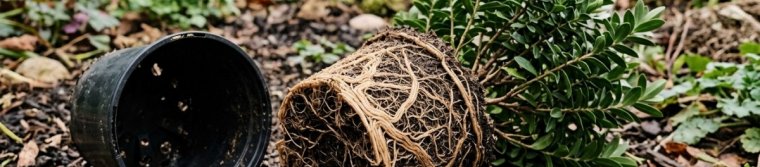
Clemson Extension notes that circling roots rarely correct themselves after planting.
Left alone, they can later wrap around the stem and strangle the shrub.
For a badly root-bound shrub, shave off the outer 1 to 2 inches of the root ball.
Think of it as turning a round root ball into a square.
Then gently tease out the outer roots and trim them back to where they begin to circle.
New roots will grow from those cuts and spread outward.
Balled-in-burlap shrubs
These shrubs are dug from a field and wrapped in burlap, twine or a wire basket.
They rarely have circling roots, but the root flare is often buried under extra soil.
Untie the burlap at the top and find the topmost roots before you dig.
Once the shrub sits in the hole, remove all burlap, straps and twine.
Bare-root shrubs
Bare-root shrubs come with the soil washed off.
The roots are easy to see, so problems are easy to spot and fix.
Dig Wide, Not Deep
Clemson Extension suggests thinking of the job as planting the root ball, not the plant.
Dig the hole two to five times wider than the root ball.
Roots grow quickly into loosened soil, so a wider hole speeds establishment.
Never dig deeper than the height from the topmost roots to the bottom of the root ball.
Leave the soil at the bottom undisturbed, so the shrub does not sink later.
The topmost roots should end up level with the soil surface, or slightly above it.
In poorly drained or compacted soil, set the top of the root ball 2 to 4 inches higher than the soil around it.
Then build up soil around the sides, but not on top of the root ball.
Backfill Gently
Break up large clods in the soil you dug out.
Fill the bottom half of the hole around the root ball and firm it lightly.
Do not pack it so hard that it compacts.
Finish filling in layers, gently firming each one.
A little water makes a mud slurry that settles soil around the roots.
Keep the root flare visible, with no extra soil on top of the root ball.
Mulch and Water
Spread 2 to 3 inches of organic mulch over the planted area.
Keep it 2 to 3 inches away from the stems, since mulch against the stem invites rot.
Pine needles, pine bark, wood chips and partly shredded leaves all work.
Our guide to mulching garden beds covers depths and materials.
Water slowly and deeply right after mulching.
For the first year, aim the water at the root ball itself.
The new roots have not yet spread into the soil around it.
Keep the root ball evenly moist, but not soggy, for the first few months.
Clemson Extension notes that many new plants die from too little or too much water early on.
Shrubs set a little high can dry out faster in summer, so check them often.
A Simple Shrub Planting Checklist
- Plant in fall when you can.
- Test the soil a few months before planting.
- Backfill a single hole with native soil only.
- Amend a whole bed evenly, with no more than 10 to 20 percent organic matter.
- Find the root flare before you dig.
- Cut or tease out circling roots on container shrubs.
- Remove all burlap, straps and twine from field-dug shrubs.
- Dig two to five times wider than the root ball, but no deeper.
- Keep the topmost roots level with the soil or slightly above.
- Mulch 2 to 3 inches deep, away from the stems.
- Water the root ball steadily through the first year.
A Calm Way to See It
Planting a shrub well takes perhaps an extra twenty minutes.
That time pays back for years in steady, healthy growth.
Once it settles in, you can learn to shape it with our guide to pruning shrubs.
Sources and Further Reading
- Clemson Cooperative Extension, Home and Garden Information Center — Planting Shrubs Correctly: supports fall planting, soil testing ahead of time, native soil backfill, bed amendment limits, drainage, root ball types, circling roots, hole width and depth, backfilling, mulch and watering.
- Clemson Cooperative Extension — Soil Testing: how to test soil before adding lime or fertilizer.
- Clemson Cooperative Extension — Mulch: choosing and spreading organic mulch.
- Clemson Cooperative Extension — How to Change Soil pH: preferred pH ranges and why lime needs time to work.