
You do not need a yard to grow your own vegetables.
A sunny balcony, patio, doorstep, or wide windowsill can hold a small and productive garden.
Containers also sidestep common garden problems.
Poor soil, soilborne diseases, and nematodes matter far less when you choose the soil yourself.
Container gardening is a calm way to start small.
You can begin with one pot of lettuce and grow from there.
This guide follows the container vegetable gardening fact sheet from Clemson Cooperative Extension.
Step 1: Find Your Sunniest Spot
Light decides what you can grow.
Watch your space for a day and note how many hours of direct sun it gets.
Clemson Extension says vegetables grown for their fruit need at least five hours of direct sun.
They perform better with eight to ten hours.
Tomatoes, peppers, eggplants, and cucumbers fall into this group.
Leafy and root crops are more forgiving.
Lettuce, spinach, radishes, and carrots can tolerate partial shade.
On a shady balcony, light-colored walls or other reflective surfaces can bounce a little extra light onto plants.
Step 2: Choose Good Containers
Almost anything can become a planter if it meets a few basic needs.
Clemson Extension lists four:
- It is big enough for the plant at full size.
- It holds soil without spilling.
- It has drainage holes in the bottom.
- It never held anything toxic to plants or people.
Clay, plastic, wood, and metal all work.
If you build a wooden box, rot-resistant cedar, cypress, or redwood lasts longest.
Most vegetables need containers at least six to eight inches deep.
Bigger is usually better.
A larger pot holds more water, so the soil stays moist longer.
Clay pots look lovely but lose water through their sides.
Plants in clay need watering more often than plants in plastic.
A wheeled plant caddy is a smart addition.
It lets you follow the sun or move plants away from a storm.
Step 3: Use a Light, Airy Potting Mix
This step matters more than most beginners expect.
Soil straight from the garden is usually too heavy for a pot.
Clay soil, especially, holds too much water and leaves roots short of air.
When it dries, it shrinks away from the sides of the pot.
Packaged potting soil from a garden center is a good, simple choice.
Very light, peat-based soilless mixes can be too airy for big vegetable plants.
Clemson Extension suggests adding some potting soil to them for better support.
For a larger container garden, you can mix your own.
Clemson's recipe uses equal parts peat moss, potting soil, and coarse builder's sand or perlite.
Add a slow-release complete fertilizer to the mix.
Lime may be needed to bring the pH to around 6.5.
A lab test can tell you whether your mix needs it.
Clemson notes that a soilless mix test needs about one quart of material.
Our guide to taking a soil sample explains how testing works.
Step 4: Pick Vegetables That Fit
Some crops are naturally suited to pots.
- Compact crops: lettuce, radishes, carrots, and green onions take little space.
- Long producers: tomatoes and peppers keep bearing fruit over many weeks.
- Herbs: basil, parsley, and chives are easy and useful in the kitchen.
Look for seed packets labeled dwarf, bush, compact, or patio.
Clemson Extension notes that dwarf varieties often bear early.
Most produce less overall than standard varieties, so plan accordingly.
For a first season, two or three crops are plenty.
Step 5: Plant With Care
Plant container crops at the same time you would plant them in the ground.
Moisten the potting mix before filling the container.
Peat absorbs water much more easily when it is soaked first.
Fill the pot to within about half an inch of the rim.
Sow seeds or set transplants at the spacing shown on the seed packet.
Water gently after planting so seeds do not wash out.
When seedlings have two or three leaves, thin them to the right spacing.
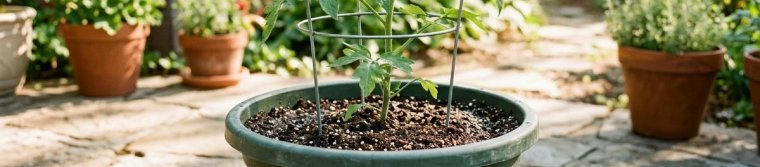
Add stakes or cages to tomatoes while they are small.
Pushing them in later can damage roots.
A small label with the variety and planting date helps you learn what works.
Step 6: Water Often and Deeply
Watering is the biggest difference between pots and garden beds.
A container holds only a small amount of soil, so it dries out quickly.
Pots on a hot concrete patio dry fastest of all.
Clemson Extension says daily or even twice-daily watering may be needed in summer.
Check each pot at least once a day, and twice on hot, dry, or windy days.
Push a finger into the mix to feel for moisture.
When you water, keep going until water runs out of the drainage holes.
The soil should never stay soggy, though.
In cool weather, constantly wet soil can lead to root rot.
A few habits make watering easier:
- Group pots together so their leaves shade the soil.
- Raise pots off hot pavement on pallets or pot feet.
- Add a thin layer of mulch on top of the soil.
- Use a simple drip system on a timer if you travel often.
On a balcony, place trays under pots so water does not drip onto neighbors below.
Step 7: Feed Gently and Regularly
A potting mix with added fertilizer usually feeds plants for about eight to ten weeks.
After that, Clemson Extension suggests a water-soluble fertilizer every two to three weeks.
Always use the rate on the label.
More is not better in a pot.
There is little soil to buffer extra fertilizer, and too much can burn and kill plants.
An occasional dose of compost or fish emulsion adds trace elements.
Everyday Care
- Check leaves for insects and spots once or twice a week.
- Move pots into shade during extreme afternoon heat.
- Shelter plants from hail, heavy rain, and strong wind.
- Bring tender plants under cover when fall frost threatens.
A Simple Starter Plan
- One large pot of cherry tomatoes in your sunniest spot.
- One wide pot of lettuce in a spot with partial shade.
- One small pot of basil near the kitchen door.
Three pots are enough to learn the rhythm of watering and feeding.
A Calm Way to Begin
Container gardening rewards small, steady attention.
A few minutes each morning with a watering can is often all it takes.
By midsummer you may be picking tomatoes a few steps from your door.
If you later want more space, a raised garden bed is a natural next step.
Sources and Further Reading
- Clemson Cooperative Extension, Home and Garden Information Center — Container Vegetable Gardening: supports the sun needs, container requirements, depth, potting mix recipe, planting steps, watering frequency, fertilizing schedule, and general care.
- Clemson Cooperative Extension — Soil Testing: supports testing soilless mixes and the sample size needed.